
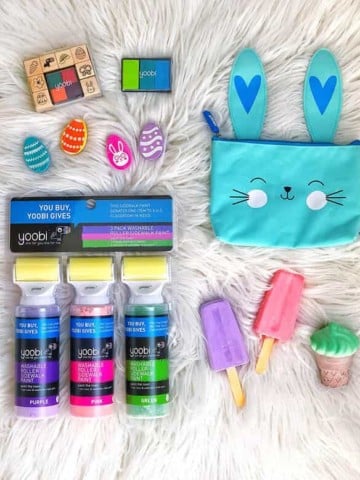
rubber band egg dying
wrap hard boiled eggs with elastic rubber bands then put it in the food-coloring dye. remove them and pat dry with paper towel and remove the rubber bands. to get more of a rainbow effect, dye the lightest color first and then then next lightest color, using the darkest color last. adding more rubber band per each color. you can also use thin painters tape in order to get the swirls around the end of the eggs.
wrap hard boiled eggs with elastic rubber bands then put it in the food-coloring dye. remove them and pat dry with paper towel and remove the rubber bands. to get more of a rainbow effect, dye the lightest color first and then then next lightest color, using the darkest color last. adding more rubber band per each color. you can also use thin painters tape in order to get the swirls around the end of the eggs.
note: If you plan to eat your Easter eggs, decorate them only with food-grade dyes. click here for the USDA's tips on Easter and Passover egg safety.
{image found via}


Therese
Am going to try that! Thx Jill!
threeboogers
These are cute. I wonder if anyone could ever get them to look like these pictures. We've done the tie dye, they are fun!
GianneCurry
Love this~!!!! I tried it with my girls. cowsgomooandducksgoquack.blogspot.com
Thanks! BTW, following now...
Gianne
MamaMay
Ok, I just would like to know how you got the rubber bands to stick to the tops sooo well. I can't get the tops and bottoms like you have yours. Thanks!
Shirley W
How do you do the ends?
LeighAnn
Thank you! I pinned this and blogged about it here -http://jamesandleighann.blogspot.com/2012/03/easters-fast-approaching.html
Anonymous
There is NO WAY this is rubber bands. I did this today and there is no way a rubber band stays on that flat once you are much past the center inch of an egg. Upon further study and investigation, I think these are dyed a base color and then rings are painted in wax and then redyed or hand painted in several layers. I would love if someone would link up actually pulling this off with rubber bands. But do not be deceived...it is definitely NOT rubber bands.
Anonymous
My eggs did NOT turn out this nice! I was very disappointed! My rubber bands would move as I added?removed some to put them in a new color. Would love to see a video!
Anonymous
Agreed - there's no way that a rubber band will stay on the egg that perfectly. These had to have been hand painted or used some other method.
If this really was done with rubber bands, I'd LOVE to see your method STEP BY STEP.
Prove us skeptics wrong.
Emma
I can't see how you can get so many different colours on one egg if you just wrap the egg in rubber bands and then dip it in dye. Why would you not tell the truth about how this was done?
Meredith@A TIPical Day
I love the look of this rubber band dying technique! Just wanted you to know that I am featuring this post in a Easter Egg Round up this week! 🙂
Stacy @ Huddlenet.com
Found your eggs over at A TIPical Day and I can't wait to do these!! I'm hosting 3 teenagers along with my own and I wanted something a little more spectacular besides the usual dipping. Love it ~Stacy
Found at: http://tipicalday.blogspot.com/2014/04/amazing-easter-egg-roundup.html