• Skip to primary navigation
  • Skip to main content
  • Skip to primary sidebar
Popsicle Blog
  • Home
  • The OC
  • Craft
    • Printables
    • Kids Crafts
    • Holiday Crafts
    • Gifts
    • Teacher's Gifts
    • Home Decor Crafts
    • Science Experiments
    • Costume Ideas
    • Tutorials
  • Eat
  • Celebrate
    • Valentine's Day
    • President's Day
    • St. Patrick's Day
    • Easter & Spring
    • Earth Day
    • Mother's Day
    • 4th of July
    • School
    • Halloween
    • Thanksgiving
    • Christmas
    • New Year
  • Travel
  • Life
    • Style
    • Products I Love
    • Tips
  • Contact
menu icon
go to homepage
search icon
Homepage link
  • Home
  • Life
  • The OC
  • Crafts
  • Eat
  • Celebrate
  • Travel
  • Style
  • Contact
    • Twitter
    • Facebook
    • Google+
    • Instagram
    • Pinterest
    • rss
  • ×

    Home » Craft

    DIY Rainbow Doormat Tutorial

    Published: Mar 17, 2014 · Modified: Feb 4, 2021 · By Jill · This post may contain affiliate links · 13 Comments

    DIY Rainbow Doormat instructions - Sandytoesandpopsicles.com #DIY #rainbow #doormat

    a couple of years ago i received the Lowes Creative Ideas magazine in the mail and saw this great rainbow doormat. i told my husband that i wanted it, and he promised to make it for my birthday. he decided he not to use the directions, and tried to make it on his own. needless to say…it didn't go very well. flash-forward two years later to the present, and he still hasn't finished my rainbow doormat. and with my birthday last weekend, i decided i was finally going to get a rainbow doormat!

    so i came up with plans for a more simple doormat. it would just be 2 x 2's strung together with ropes, and stainless steel nuts to act as spacers, keeping the boards separated. i figured that we could accomplish making this doormat in just a few hours. and we did…and i love it.

    rainbow-doormat-instructions

    i thought i would share how we made it, since many people have been asking. so continue reading below for the complete instructions on how to make it. i was able to buy everything i needed at my local home improvement store.

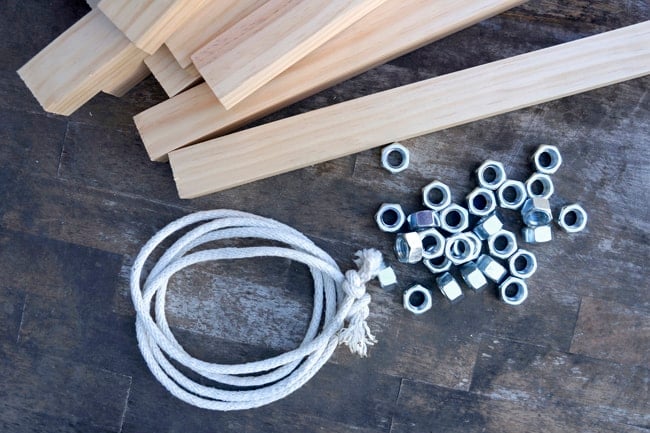
    to make this doormat, here is what you will need:

    •  (4)  2" x 2"" x 8' Lumber cut into (16) 23-½" boards
    •  (30) ⅝" Stainless steel nuts
    •  7' of Rope (i used cotton clothesline)
    •  Drill with ¼ - ⅜" drill bit
    •  Sandpaper
    •  Paint  (i used Plaid FolkArt Acrylic paints from my local craft store. i like the range of colors they offer. but you could also use spray paint or house paint)
    • Clear Polyurethane Coating (i used Krylon Clear Polyurethane Coating Spray)

    diy-doormat-instructions

    first, cut the 2"x 2" x 8' lumber into (16) 23-½" boards. you can probably find inexpensive pine for $.99 per 8' board. however, i felt that the soft pine wouldn't be durable enough to withstand all the foot traffic at my house, so i opted to buy the more expensive kiln dried wood. even though it was about $8 per 8' board this was the best decision. not only is the wood smoother and straighter, it also doesn't dent or ding as easily.

    also, it was awesome that home improvement store cut all the boards for me…i didn't even have to make a mess with the saw at home.

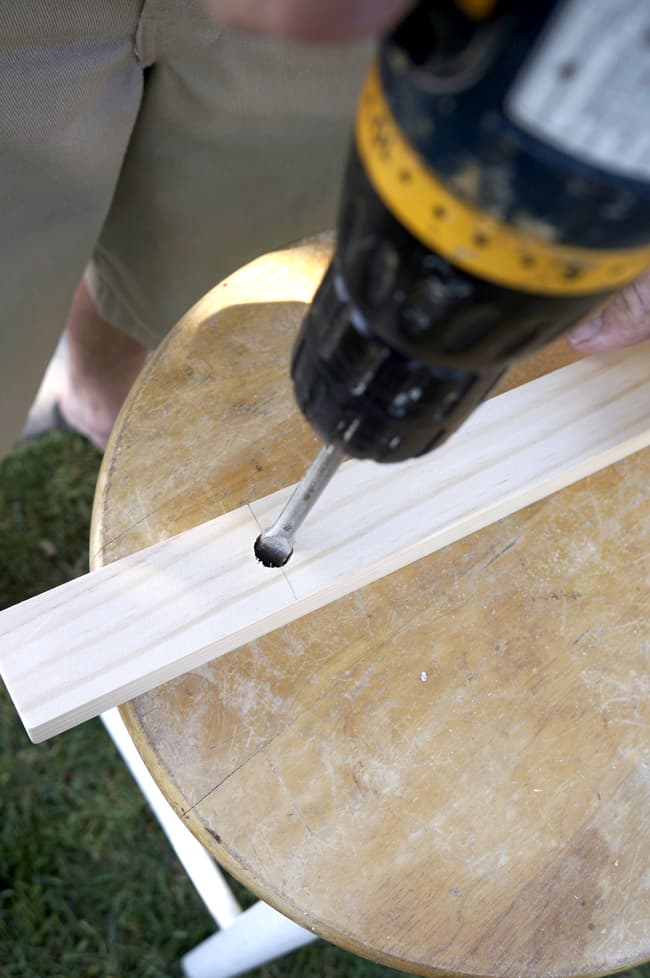
    next, drill two holes in each board by measuring 4 inches down on each side of the (16) boards, and marking the center point. drill all the way through.

    diy-rope-doormat-instructions

    once all the boards have been cut and drilled, use sand paper to sand all the rough edges. you can now paint the boards any color that you want. i recommend two coats of paint.

    when the paint is completely dry, spray two coats of clear polyurethane coating to seal the boards. you can use gloss or matte. whichever you prefer. let the spray completely dry.

    diy-wooden-rainbow-mat-instructions


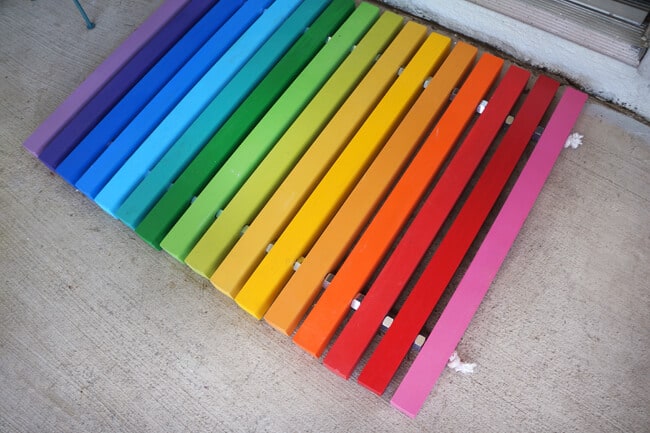
    now is the fun part….putting the doormat together.

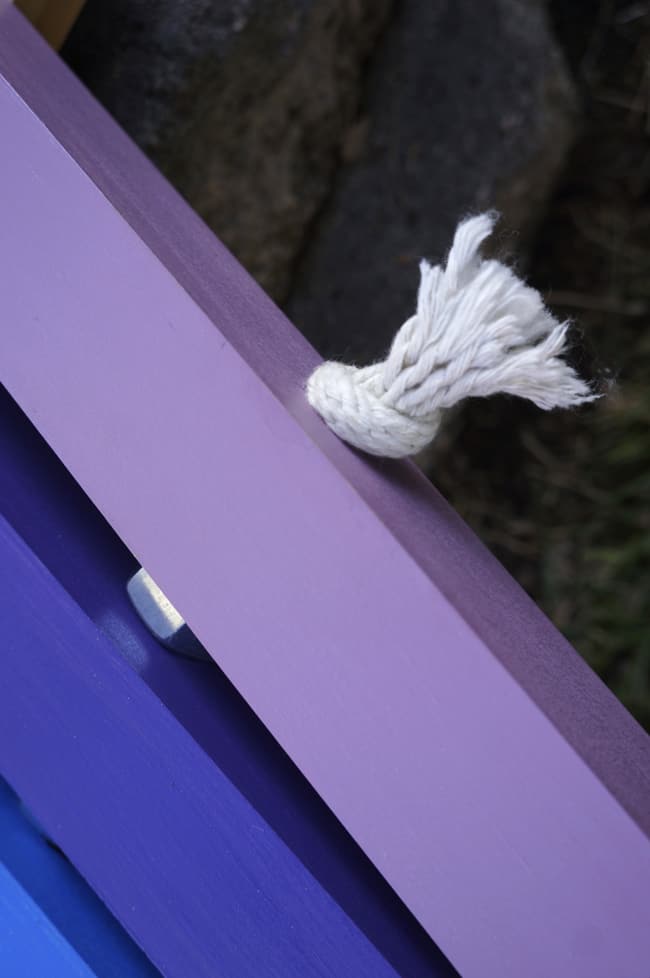
    start by tying a knot at the end of the rope, and wrap masking tape on the other end of the rope to make it easier to thread through the boards. lay the boards out in the order that you want your finished doormat to be. thread the rope through the first hole, then add a nut spacer.

    rainbow-doormat-tutorial

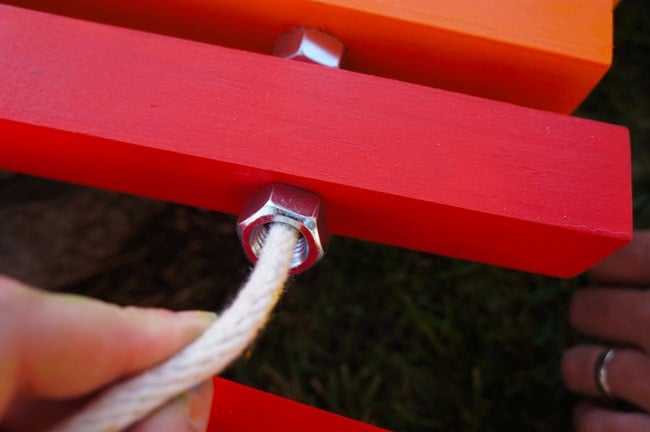
     repeat threading the rope and then a nut spacer until you have used all the boards.

    how-to-make-a-rainbow-doormat

    finish by tying off the rope and cutting it leaving 1" tail.

    repeat these steps with the other set of holes at the other end of the boards.

    diy-wood-doormat

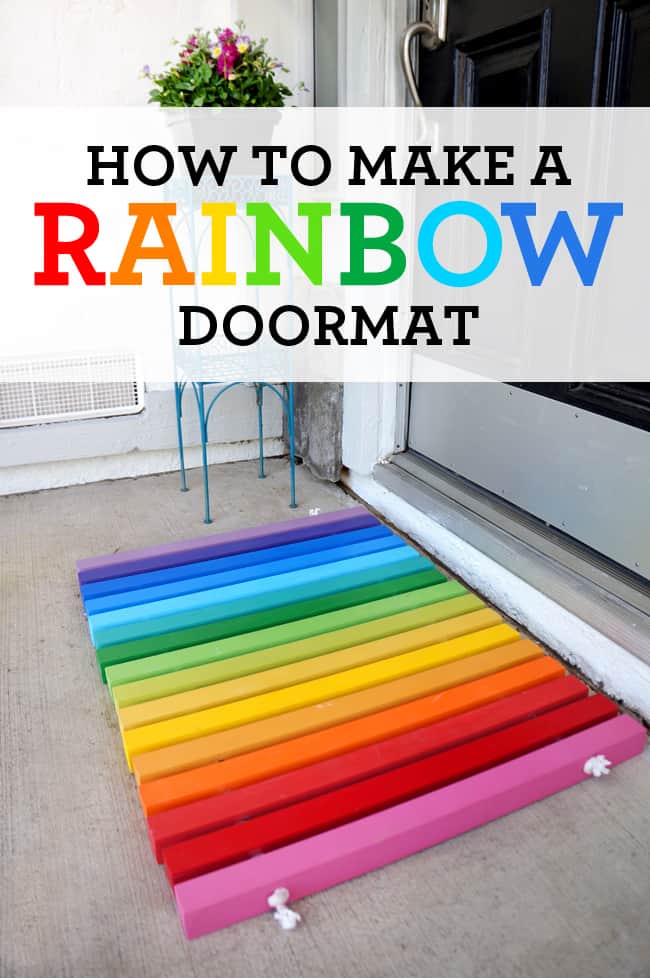
    here is the finished product.

    How to make a Rainbow Doormat

    i am thrilled with how it turned out….and everyone who has come to my front door has commented on how great it is. people have even offered to pay me to make them one. luckily, they can just come here and learn how to make their own.

    DIY Rainbow Doormat tutorial

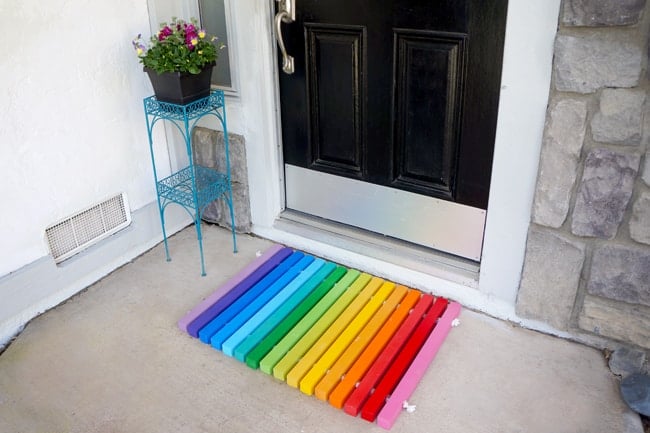
    i just love my RAINBOW doormat.


    Tweet about this on Twitter
    Twitter
    Share on Facebook
    Facebook
    Pin on Pinterest
    Pinterest

    Reader Interactions

    Comments

    1. AvatarBarb

      February 09, 2017 at 1:19 pm

      This is Soooo cute. Even though I like rainbows, it's a no go for my hubby, so I think I'll do one with
      A very dark grey on the center 2boards and then gradually go out a shade lighter on each side. ( I'm starting with the darkest in the center area cause that's the part that will get the dirtiest the fastest.) you could even do a checkerboard or other pattern this way. So many possibilities with this great construction ! Thanks again.

      Reply
    2. AvatarRosanne R

      January 10, 2016 at 9:55 pm

      I love this!!

      Reply
    3. AvatarDonelle

      March 19, 2014 at 6:17 pm

      Super cute!!! I have been in full nesting mode as I approach baby's due date and wanting to make changes all over our house, unfortunately, I am the only one in this house that is down for the change. This doormat is something I would love to add to front of the house. Thanks for the tutorial!!

      Reply
      • JillJill

        March 20, 2014 at 1:04 pm

        The only power tool you need is a drill because they will cut the wood for you at the store. You could totally make this. And p.s. Sorry you have to do all the home improvements.

        Reply
    4. AvatarBertha

      March 19, 2014 at 2:34 pm

      Beautiful!

      Reply
      • JillJill

        March 20, 2014 at 1:04 pm

        Thank you!

        Reply
    5. AvatarSharon Garvey

      August 06, 2019 at 8:56 pm

      Oh your rainbow door mat is so creative and innovative! I’m trying to make this with my daughter but I cannot figure out the names of the Plaid FolkArt paint colors that I need to use to get a similar rainbow color progression that you mastered! You have an eye for color! If you happened to note the paint colors or paint color numbers that you used, would you possibly be able to help me? I’m struggling with this craft but I’m not going to give up! Thank you for your inspiration! ???? Warmly, Sharon

      Reply

    Trackbacks

    1. 68 DIY Door Mats - Graceful & Personalized Tutorials says:
      11/2/18 at 7:16 am

      […] Image: sandytoesandpopsicles […]

      Reply
    2. 25 Door Mat DIYs | Crafty Chica says:
      5/17/16 at 12:00 am

      […] 3. Popsicle Blog celebrates mucho colores with this bright and cheery Rainbow Door Mat. […]

      Reply
    3. DIY Rainbow Crafts | The Gracious Wife says:
      4/26/16 at 2:27 pm

      […]  DIY Rainbow Doormat from Popsicle […]

      Reply
    4. Popsicle Blog's Most Popular Posts of 2015 | Giveaway - Popsicle Blog says:
      1/6/16 at 1:26 am

      […] DIY Rainbow Doormat Tutorial. i am so excited that this post made the list. my rainbow doormat is one of the things that makes me happy when i look at it. i also hope it brings a smile to those who come to my door. which reminds me that it currently needs some touch up…and i may want to make a few more for my backyard doors. […]

      Reply
    5. Make a Wintery Holiday Wreath with Sparkle® Towels with a Hint of Color - Popsicle Blog says:
      10/27/14 at 12:54 pm

      […] towels with pop of blue color. and as you can probably guess from my colorful blog and many of my craft posts, I LOVE […]

      Reply
    6. Rainbow DoorMat You will Enjoy making with your Children this Summer says:
      5/22/14 at 2:20 pm

      […] Get the Full Instructions HERE […]

      Reply

    Leave a Reply Cancel reply

    Your email address will not be published. Required fields are marked *

    Recipe Rating


    Primary Sidebar

    About Me

    JillWe love living in Orange County... from the beach, to theme parks, to the great weather and food. We couldn't be more happy here. Sharing the greatest things to do in the OC is what we do best... Read More…

    jillparkin @ gmail.com

    • Twitter
    • Facebook
    • Google+
    • Instagram
    • Pinterest
    • rss
    • Work with Us
    • Contact
    • As Seen On
    • Disclosure & Privacy Policy

    Recent Posts

    • Celebrating Springtime at South Coast Plaza
    • 2021 Easter Egg Hunts and Spring Events in Orange County
    • Flintstones Bedrock City: A Quirky Arizona Roadside Stop
    • Jurassic Quest Drive Thru Has Come to Orange County

    Need Something to Do?

    The Best Road Trip Ever

    Subscribe

    Stay on top of what’s new by subscribing!

    Footer

    ↑ back to top

    ARCHIVES

    Copyright © 2020 Popsicle Blog