

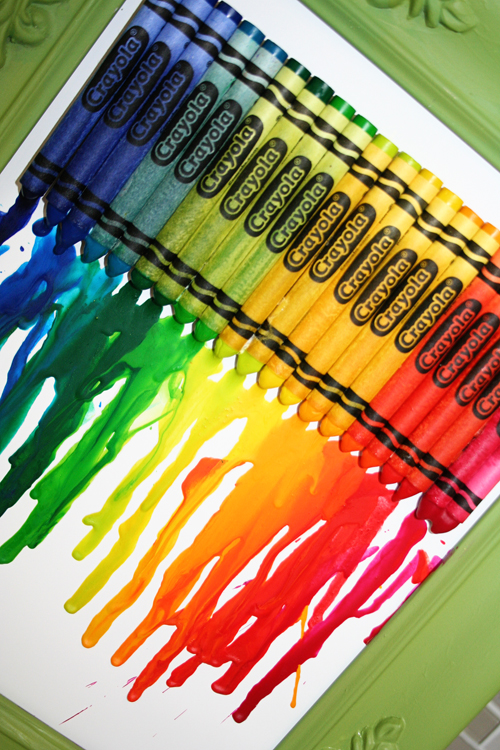
since i am having to completely redo the house from the flood we had a few months back....i have been trying to create a more playful atmosphere around here. i like things eclectic, and a bit quirky. so the boys and i made these melted crayon art pictures to hang on the wall. what kid doesn't like to see things melt into beautiful streams of color. seriously cool and super simple.
make your own
melted crayon art
what you need:
• crayons
• got glue gun
• cardboard cut to size
• blow dryer
• frame (optional)
directions:
• glue crayons to the cardboard using hot glue
• lay your cardboard at an angle (approximately 45º)
• using the lowest speed and hot/warm setting, start melting the crayons.
• you can manipulate the wax drops as they start to fall by angling the blow dryer or adjusting the angle of the cardboard.
• let cool
• the great thing about this art piece is that you can make it any way you want, and no two are the same.

{participating in i heart naptime, funky polka dot giraffe, ta da tuesday, get your craft on, tatertots and jello & skip to my lou linky parties}

tomiannie
That is way cool! I especially love your bright green frame with it. I think this may have to find its way onto our art wall!
Donelle Anderson
Very cute!
Su
We JUST made these this weekend. But I love that you used cardboard instead of canvases (with 5 kids and friends making these, the cost of canvases added up). I also love that you put it in a colorful frame. Do you mind sharing what color/paint you used to paint your frame?? Is it spray paint?? Love it!!
Rhiannon
love it! great tutorial.
Hope Sewell
Too Cute!! Found you on skip to my lou! 😉
Jamie
Wow what a cool project!
Please feel free to link you melted crayon up to my new Make Yourself Monday Blog Hop!
-Jamie
For Love of Cupcakes
Ashley J
This is so fun! I love the green frame too! LOVE IT!!! I would love it if you would link this up to my Ta-Da Tuesday link party starting tonight at midnight!!
http://mommybydaycrafterbynight.blogspot.com
xoxo, Ashley J
Megan
This is such a neat idea!
It's me!....Jill
I used craft paint to paint the frame. Hauser Light Green by Americana/Deco Art. It did wonders to that old silver frame. Much more character. I will need to spray it with some clear coat though.
Christy
I agree..Im trying to make my walls more "fun" for my kids too. I am going to give this a try! Thanks for showing it off. 🙂
Tiffany
That is such a fun and simple piece of art, Love it!
Mandi
This is way too cool! I'm getting ready to overhaul my boys' playroom, and this would be perfect art for in there! Never thought of this! Thank you so much for the inspiration! Visiting from Too Cute Tuesday! I would love it if you stopped by my blog to say hi! 🙂
Mandi from boredombustingmommy.blogspot.com
Eve
What an amazing project. How creative!
If you have a minute I would love if you would enter my custom made Pinstripe skirt GIVEAWAY.
http://theorchardinbloom.blogspot.com/2011/08/pinstripe-skirt-giveaway.html
Laura Beth
I LOVE how you framed your crayon art :)I'm featuring your art at Blogland's Fabulous Friday Finds!!
http://www.astepinthejourney.blogspot.com
Vanessa
I love it!! I would love for you to link up at "Do Something Crafty Friday":
http://vanessascraftynest.blogspot.com/2011/09/do-something-crafty-friday.html
Cindy
We just made one of these this week too! Love the cute frame!!!
a wee Bonnie
I can't wait until I find time to do this!! This would be perfect in a kids playroom, nice job!
Bonnie
http://www.aweemeenit.blogspot.com
odetoinspiration
Cute idea! Would make a neat teacher gift...going to keep it in mind for teacher appreciation week:D
Colleen
I have seen these all over Pinterest and your version looks way more "finished" and clean. 🙂
My boyfriend and I started making these in August and we're having a lot of fun messing around with different techniques.
I was wondering if you could share where you got the frame from? I really like that you repainted it and the shade of green you chose looks lovely.
Looking forward to seeing more of your projects,
-Colleen
thegrandcrayonyon@gmail.com
http://www.etsy.com/shop/thegrandcrayonyon
Anonymous
This is so cool - can't wait to try it - I am new to pinterest - so you mind if I post this there and how do you do it - I would love to have this on my board to find it again easily
Thanks Stephanie
Anonymous
They sale this at esty for $35!!!!
Crazy Copycats!!!!